So I’ve had on my to do list for a while a bit of coding to take an input text and add ‘rel=”nofollow”‘ to any links that don’t already have it set. In theory it’s a straightforward thing to do, either use a regex or something like DOMDocument to parse the text. But it’s a bit of a faff and I haven’t gotten round to it yet.
I have though having a play around with ChatGPT and chatting to a friend he said “have you used it for coding yet”. So I thought this one might be a good place to start checking it out and wow is it good.
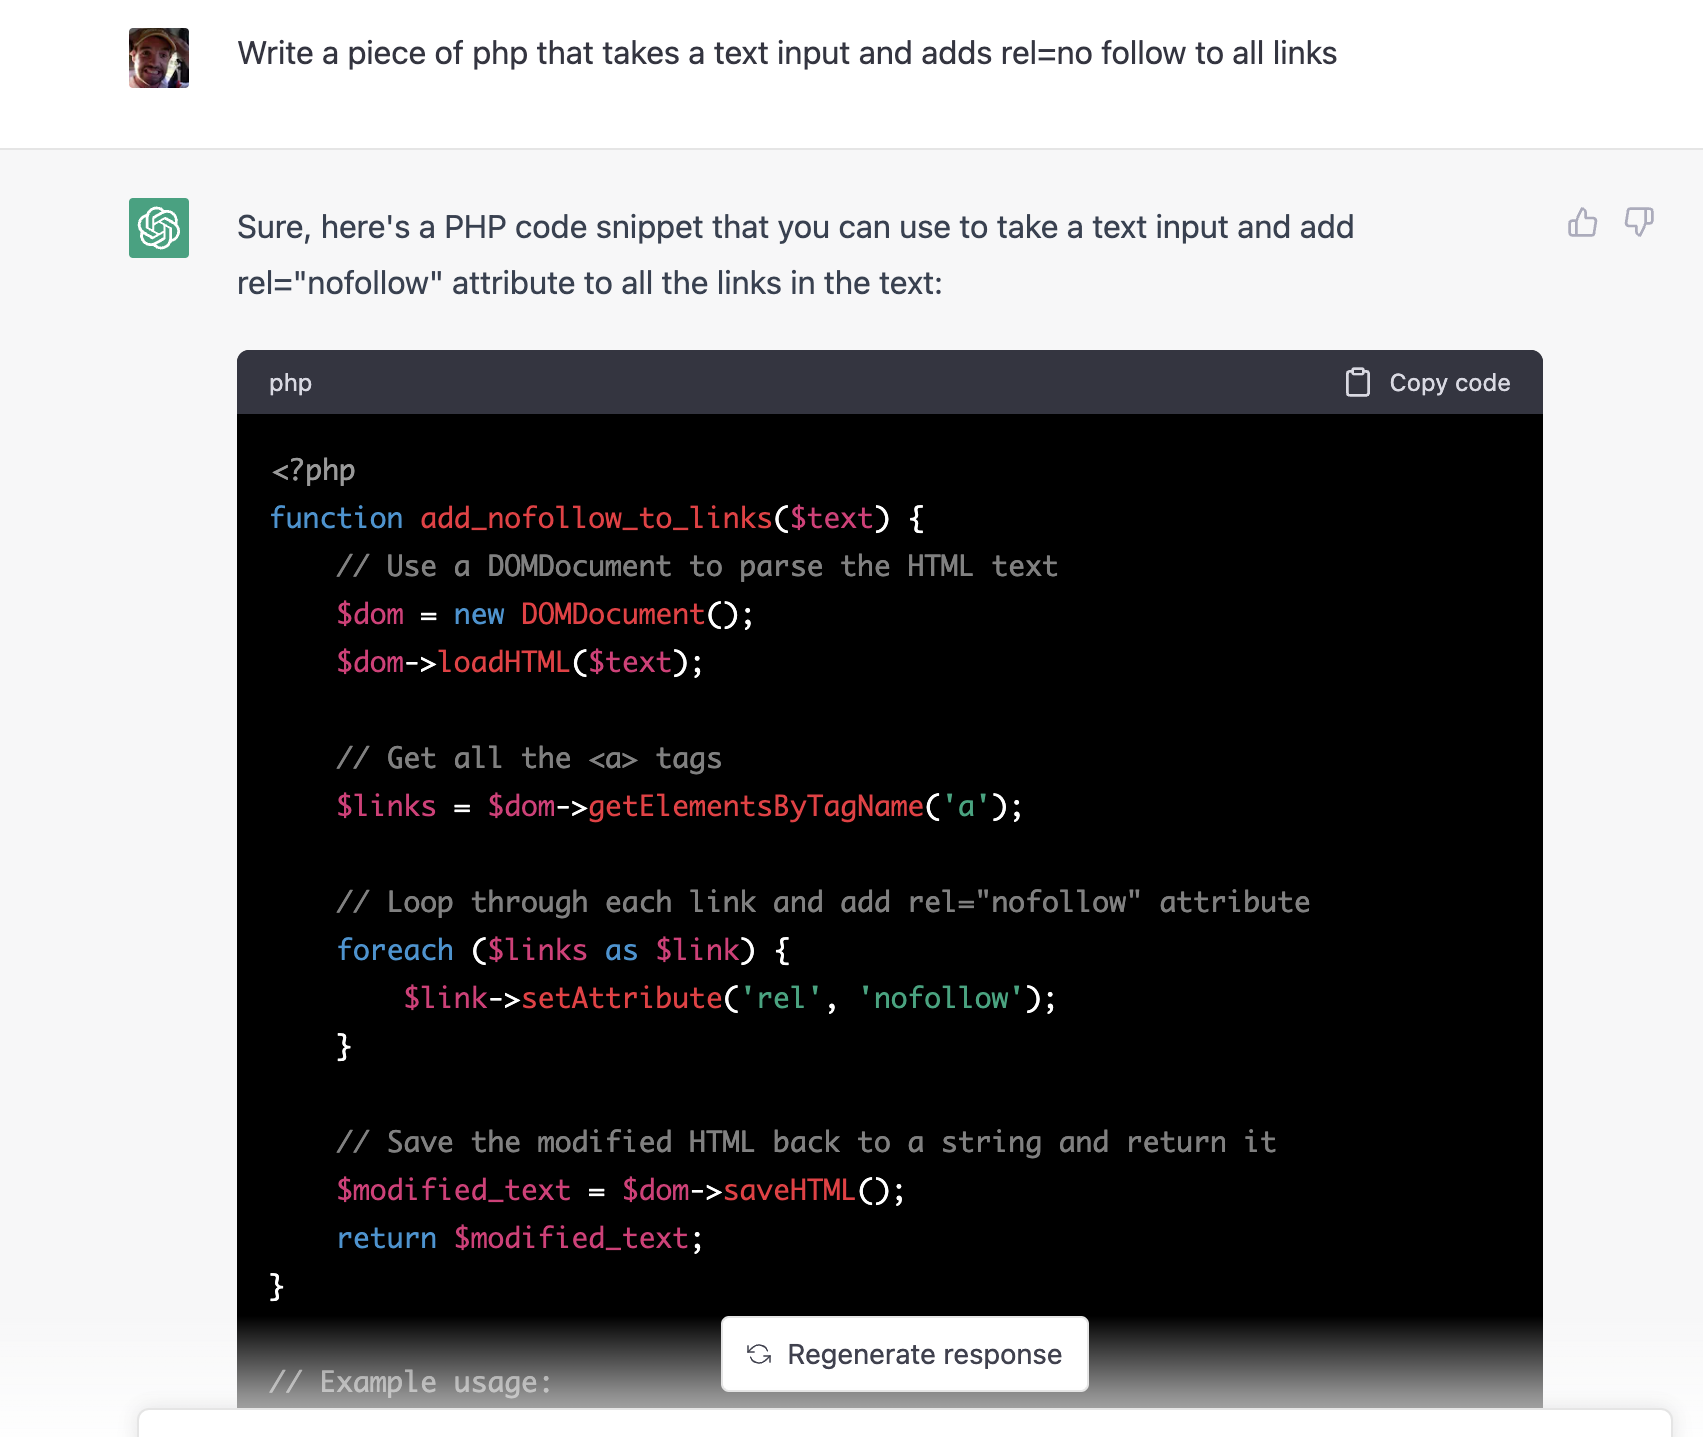
ChatGPT coding
As you can see from the screenshot above in a matter of a minute or so I have my function. But looking at that I thought “I wonder if it’d be better with regex”. So why not ask?
It’s a simple as typing “rewrite the function using regex instead of DOMDocument” and here’s the new output.
function add_nofollow_to_links_regex($text) {
// Define the regex pattern to match tags and their attributes
$pattern = '/]*?\s+)?href=(["\'])(.*?)\1(?:[^>]*?\s+)?(.*?)?>/i';
I really think ChatGPT does have the power to be game changing here, there are a few caveats though, one being I think you need to have some idea of what you’re expecting back and I’d probably make sure to test what you’re getting quite thoroughly as well. But if you learn how to ask and refine your requests you can get some great stuff back.
There’s a great podcast from Drowned in Sound that whilst it approaches it from a musician perspective gives some great info about how to use these new AI tools
So you’ve got your nice shiny new site all ready on the staging site and you need to make it live! This is a step that is fraught with peril and danger!!!! Only kidding, if you do things properly it’s pretty straight forward.
My preferred tool for deploying a WordPress site is a plugin called Duplicator which you can find here https://wordpress.org/plugins/duplicator/ or by typing in “Duplicator” to your add plugin screen in the WordPress admin. So below is a quick guide where I’ll look at deploying over an existing site and also deploying to a new domain, for the purpose of the example deploying staging.thesite.com to thesite.com. The example below is also targeted at two mainly static sites, if you have a more dynamic site, housing lots of comments etc then you’ll need to consider additional steps for data migration and when to put up holding pages on the live site etc. However most of the steps here can still be applied just with a little more caution and forward planning.
Preparing the Staging site
First things first then, get the staging site ready to move. Make sure everyone working on it knows that the site is now being moved so they stop making changes as any changes now stand a good chance of getting lost in the move.
Is it up to date?
So time to make sure the site is up to date. No point moving it and then applying a load of WordPress and plugin updates, best get them all done now and make sure everything is ok. Also make sure you have all your appropriate plugins installed for going live, Yoast, WordFence, Caching plugin, image optimisation.
Analytics
It might be a good point here to make a note of anything like analytics code so you can easily add them to the new site without having to go and dig out your account details.
Duplicating the site
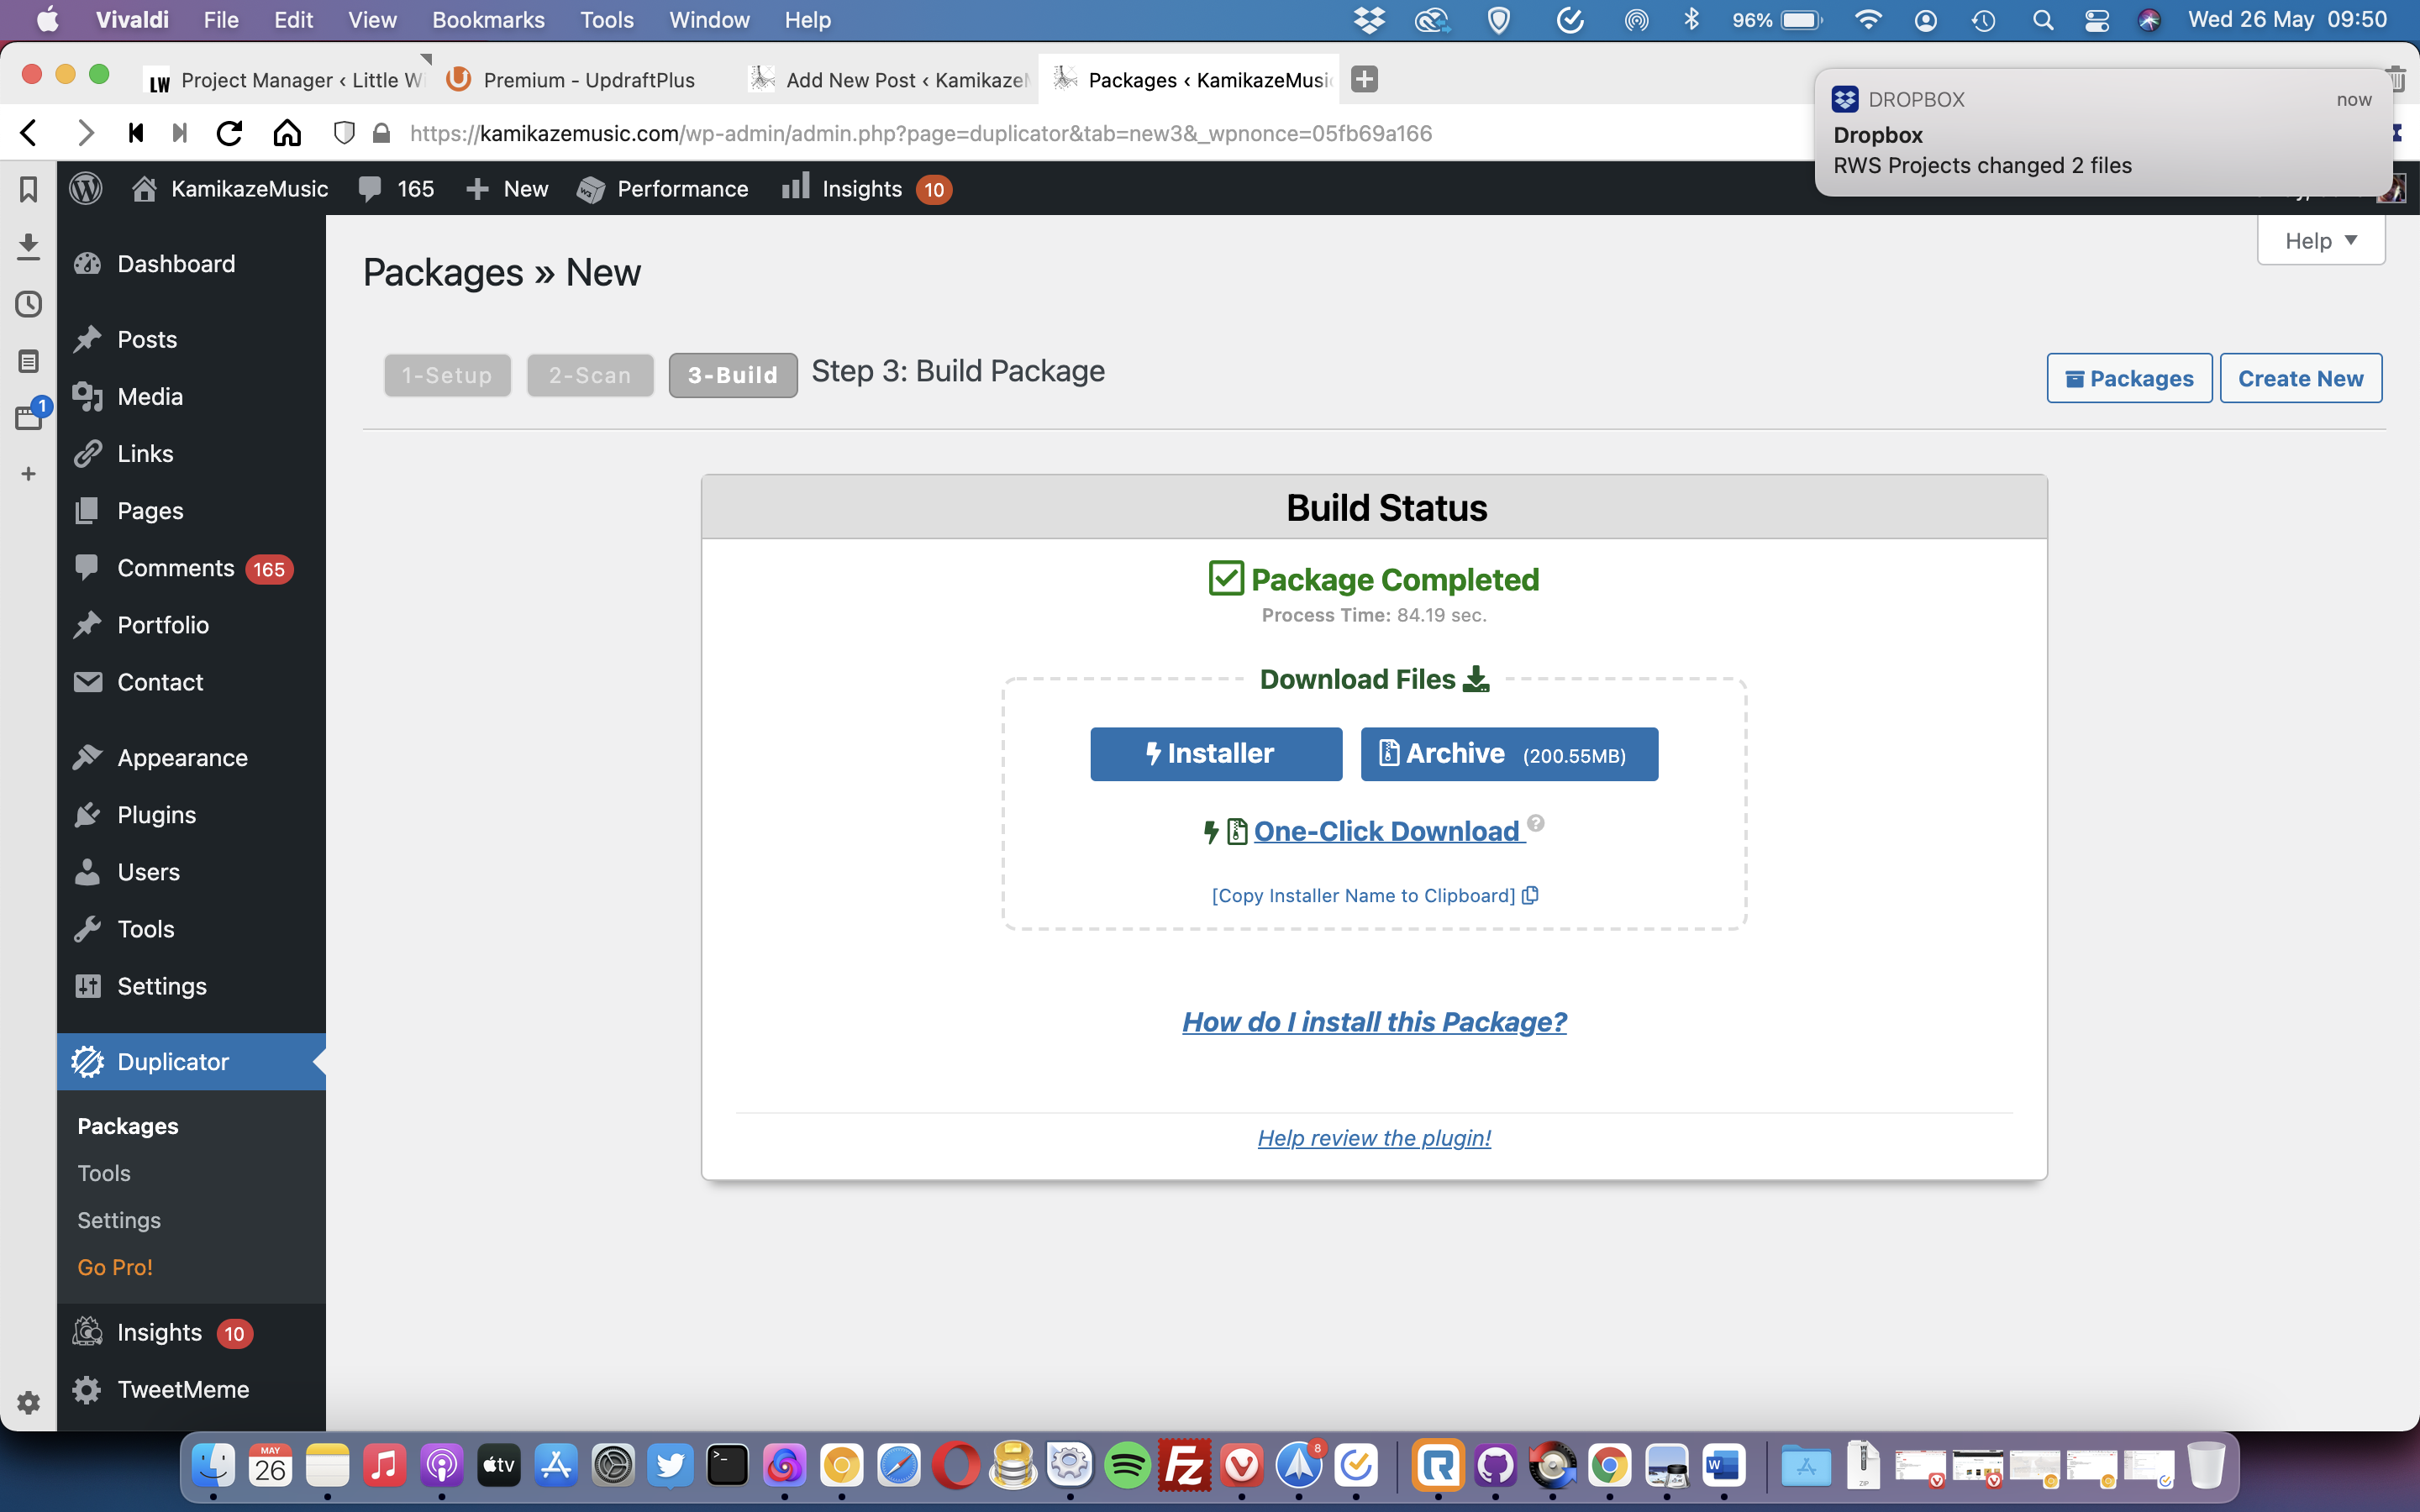
Now we run the duplicator plugin, obviously if it’s not already there on the staging site then install it, head to the Duplicator menu item on the main WordPress admin menu. You should see a button labeled “Create New” so click on that.
The Duplicator main page with the “create new” button top right.
Now head through the step by step process until you get a package at the end, download both the zip file and the installer.php file and keep them safe for later on.
The Duplicator build completed, click on “One-Click Download” and look out for a pop up about multiple files downloads in browsers like Chrome
My site is too big!
One issue you can run into here, especially with media heavy sites, is the site being too big for WordPress Duplicator. There are ways to increase the allowable limits, notably with Duplicator Pro. However my personal choice is the let duplicator handle the database and manually move the site files. In this case when you first click “Create new” for the package, open up the Archive tab and select “archive the database only”. You’ll still get a package out at the end but you’ll need to back up everything in the staging sites’s route directory ready to move. So head in via FTP or a hosting file manager and backup all those files ready to upload to the new site later.
Preparing the new site
So the staging site is all ready to go, we now need to get ready for uploading to the destination. There will be a couple of different permutations here mainly
Uploading over a new site
Uploading to an entirely new domain (maybe with something like a holding page in place)
Moving to a new server
So we’ll look at the first two first as they’re roughly similar and then discuss doing the last one further down the line.
Backup Backup Backup
First things first, backup what’s already there, even if it’s just a holding page. If it’s a WordPress site you can use duplicator like above to do so. Then keep those backups handy, if anything goes wrong (it shouldn’t!) you’ll want to be able to roll back easily if it does.
Setup the FTP and database
So you’ve got everything backed up, good job. You now need to upload your duplicator package and get ready to install it. So get your FTP and database details ready. If you’ve got an existing site setup then you can use the existing details, if it’s WordPress you can grab the database details from the wp-config.php file. Bear in mind using the existing details will overwrite your current live site data – hence the backup we’ve just done. If you haven’t got an existing setup you need to go into your hosting and create a database, a database user and assign a password and also create an FTP user.
Upload the Package
Next step is to upload the package / files. If your site was small enough then you just have installer.php and a zip file to upload, so go ahead and pop those into the main site folder on your server. If you’ve had to backup your files separately then I recommend clearing out the site’s main folder, uploading all your files backed up from your staging site and then adding the installer.php and zip file from Duplicator. You’ll get a few errors on the front end as stuff uploads but we’re nearly there.
Unpack it all and go live!
Now you visit the installer.php to go live! Navigate to thesite.com/installer.php and you’ll get a step through guide to deploy the site. Have your database credentials handy as you’ll need to pop these in during the process as well.
If you’re overwriting an existing site then Duplicator will install the files over the top of the current site. If you’ve copied the files separately then Duplicator will simply set up the database and work with the files you’ve uploaded. Once it’s all done though you’ll be pointed to the login page, use the same credentials as you did on the dev site to login and Duplicator will do a cleanup and remove all the install files from your domain.
It’s alive
So that’s it you’re live, at this point you still have a few tasks to do. Have a look around for a start and check everything is working, test contact forms etc. Make sure you have all the relevant plugins such as caching, firewall etc now turned on and of course make sure you’ve unticked the “Discourage search engines from indexing this site” option in Settings > Reading. Also add back in the analytics code and similar if you need to.
I’d recommend taking another backup of the site now as your day 0 backup. But well done you’ve deployed a new WordPress site.
Moving to a new server
So I mentioned three options above for deploying to a live site, the third one being moving the site to a new server in the process. I have a preferred method for doing this which requires a little more technical involvement. Specifically this scenario is referring to a move from a thissite.com from server A to server B as part of going live.
On the new server B you do all the steps as above, setting up the domain on the server as you would normally and uploading all the files, however when you visit thesite.com/installer.php you aren’t going to get very far as the DNS will still point you to server A. This is where you need to delve into your local machine settings for a bit of help. Your computer contains a “hosts” file which tells it where to look for a certain site. In this case you need to edit your hosts file to tell it to find thesite.com at the IP address of server A instead of server B. I won’t put a detailed description of changing your hosts file in here as there are plenty of articles about that (check out this one https://www.hostgator.com/help/article/how-do-i-change-my-hosts-file). But the process is to adjust your hosts file and when you are now pointing at the new server B you can run through the steps as above with no problem. Once you’re done and happy, reset your hosts file back and then update the domain DNS to point the site address at the new server B (either adjusting an A record or changing the nameservers entirely) As the DNS changes propagate the site should gradually change to pointing at the new server for users over the next 48 hours
Managing live site data during a move
One other thing mentioned at the start is dealing with a site that collects data such as comments on an ongoing basis. Again I won’t go into an exhaustive process here but my preferred method is roughly
Get the dev site ready
Put the live site into maintenance mode and back it up
Migrate all the new data such as comments, posts etc to the dev
Check the dev site is all correct and working and then follow the steps as above to deploy the site to a live setup
I’ll say it again “Backup, backup, backup”
Once you’ve done a few sites this process becomes quite familiar, they’ll all throw up little tweaks, license clashes for plugins and things like that. But one thing to remember is every step of way to take backups. As long as you have a quickly deployable backup of any stage of the process you can rescue any issues.
One thing I often do is end up overseeing WordPress site updates, both to the WordPress core and to plugins. In theory this is an easy task, and a very important one especially security wise, but often people are reluctant do it. There’s one main reason and that is breaking things. Generally it doesn’t happen and the benefits of breaking a small section of a site are usually massively outweighed by not leaving a vulnerability in the site and getting hacked.
Of course a WordPress core update, especially to a new version needs a bit of planning, but a plugin update is usually trivial. However the issues that can occur were highlighted recently when I discovered a change in the Theme My Login plugin. This plugin allows WordPress site owners to setup login and registration forms that are powered by the site templates, thus keeping everything more focussed and on brand. In a recent version the developers have now removed automatic redirecting after login and have instead added this functionality as a paid for plugin. I’ll be honest I don’t think that’s a great idea and will annoy a lot of the user base for the plugin but I’m sure the developers have weighed up their thinking behind the decision. That said removing this core functionality essentially breaks the login process. You login and land on the same page with an empty login form, which would take an eagle eyed user to spot. So what to do? If you don’t wish to pay for the plugin then I would point you in the direction of this tutorial on Envato (https://code.tutsplus.com/series/build-a-custom-wordpress-user-flow–cms-816) It needs a little developer know how but there is a downloadable version you can grab from github on the article to get you going.
If you’ve been sensible and backed up you can always roll back and use an old version and continue on with that.
It is worth having a think through the options. But mainly I just wanted to point out the Envato tutorial for anyone who’s looking for a solution to this problem at the moment.
It’s a problem you should look to fix though, as mentioned at the start of the article, building up security issues is not worth it to save solving a few functionality issues.
So like everyone 2020 has been some year so far. One big thing for me is moving from full time to part time flying, a little earlier than planned and a little more part time than I had planned to. The upshot of which is I’m doing much more web development work and enjoying it!
Ahead of this I started a little bit of a rebrand, but managed to pick up work quite quickly and as with all good “internal” projects it gets pushed back. However I have finally launched my new site and essentially rebranded my dev side of work to https://littlewingdev.uk As you’ll see when you visit the site I’m not really keeping a full portfolio, mainly because of the fact I’m doing a lot of “white label” type work and joining clients as part of their in house teams to help clear backlogs and plug gaps in experience.
I’ll be keeping the site here as my blog slightly separate and hopefully start to post a few more web posts (I already have a few drafts started!)
Moving Hosts
I’ve also moved my hosting. I’ve hosted with Media Temple for over a decade but having found clients I work with often want a U.K. based service recommended I decided to switch over myself so I’m now with TSO Hosts and all is going well so far.
I’ve recently been playing around with the Statamic CMS for a project and generally I’m impressed. It is a nicely put together CMS that comes without the need for a database.
One thing I have noticed though is that as a developer you can tell this is a relatively new CMS and doesn’t have the maturity and features of something such as WordPress. That said I don’t think it’s planning to emulate the likes of WordPress and wants to be a much simpler system. There is great support via twitter etc and it seems to be growing a community. Which is the key and strength of platforms such as WordPress. So in the spirit of this I’ve shared a couple of plugins I’ve created myself to solve a few little niggles I’ve come across so far.
The first two are related, when using an excerpt there is a truncate feature but the application of it for using a word count leaves an issue of open tags in HTML content and can cause some problems. I’ve put together a basic close tags add on which you can find on github here – Statamic-Close-Tags. However that doesn’t quite work within the truncate function as it is applied.
Using close tags there applies the modifier before the truncation. So I’ve created a new words truncate modifier which also closes tags, that one is at statamic-word-truncate and you can apply it quite easily onto the content tag.
{{ content|word_truncate:100 }}
The second issue I’ve had is using the Redactor WYSIWYG editor as it sometimes has issues with smart quotes and Unicode characters (see my post here). So I’ve stuck together a plugin to convert some common trouble makers to unicode characters so they display properly and you’ll find that one here Statamic-kill-quotes.
I’m looking forward to seeing what the upcoming new version of Statamic is capable of but in the meantime I’ll happily use and recommend the current version and hopefully these little plugins can help some other people out.